Put Everything Together and Export it
Sketch 101
Draw together all your work into a unified web layout.


It’s the final day of Sketch 101!
Over the past week, you’ve learned and practiced many of the most important commands in Sketch. Here’s a summary of what we’ve covered:
- Installing and licensing Sketch
- Finding our way around Sketch’s interface
- Setting up an artboard
- Zooming in and out
- Renaming elements
- Selection and deselection
- Toolbar customisation
- Setting up a column grid
- Duplication
- Workflow principles
- Keyboard shortcuts
- Using simple shapes
- Editing the points within a shape
- Rotation
- Uniting shapes (Union command)
- Cutting out shapes (Subtract command)
- Alignment tools
- Border and fill settings
- Changing border and fill defaults
- Setting corner radius
- Using text boxes
- Grouping
- Toggling layout guides on and off
- Creating Symbols
- Symbols master view
- Using Symbol overrides
- Locking elements within a Symbol master
- Using the pen tool
- Creating Bézier curves with the pen tool
- Copying and pasting between files
Today’s learning objectives
- Assemble objects and symbols into a unified design
- Setting up a document for export
Reading & doing time: 40 mins (including some polishing up of your layout)
Our final task is to put all of the elements we’ve created into a unified web layout, and then learn how to export that design into a file suitable for sharing, like a PNG image file, or a PDF.
Tutorial: Complete and export your design
1. Assemble your design!
Using everything we’ve learned over the past week, let’s put together all of our design elements into a webpage layout. Remember to use the column guides to organize the layout, and to create Symbols for any repeated elements like buttons and cards. Feel free to get creative with your layout, but if you need inspiration or something to copy from, download our complete example layout Sketch file!
2. Make your design exportable
Exporting in Sketch is nice and easy. To prepare an artboard for export, just select the artboard, and click “Make Exportable” at the bottom of the Inspector.
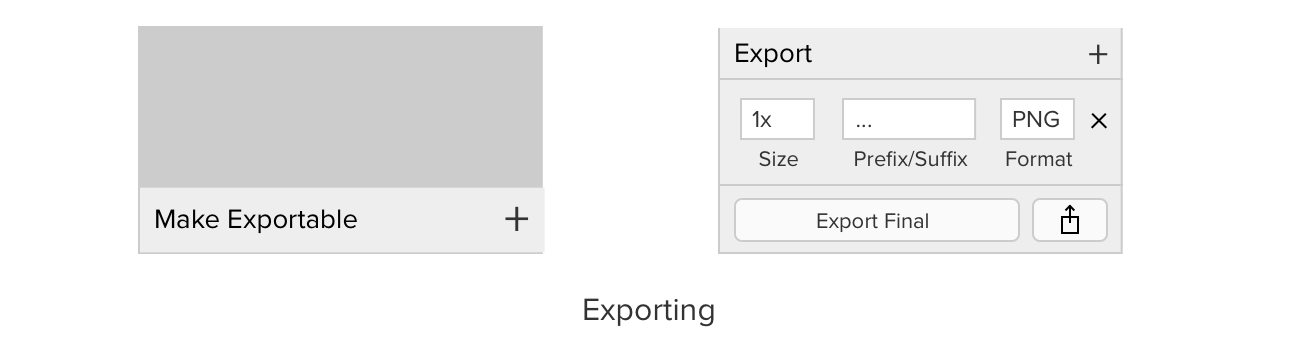
3. Choose your export size
We can set the export size in a number of ways. Using “1x” (the default) will export a file to the same pixel dimensions as the artboard. “2x” will export it to double the dimensions – this is usually used to create “retina-ready” graphics, meaning they will display properly on high-resolution computer screens that have higher pixel density. We can also size the export using pixel values, e.g. “640px” or “1024px”. For now, let’s go with “2x”.
4. Choose your export format
Sketch offers a number of export file formats. PNG and PDF are the most commonly used for the purposes of sharing files. PNG files are compressed, lossless bitmaps, and are useful for web graphics or adding into documents and emails. They are preferable to JPEGs, because JPEG is a compression algorithm intended for photographs rather than web graphics. PDFs are useful if we want to ensure that text elements within the exported file can still be selected as text.
5. Click “Export” and choose a filename and save location
Your export is complete! If you ever want to export lots of artboards at once, check out the options in the “Share” menu. You can also try out Slices, which allow you to create a special snippet for exporting. To create a Slice, just press [S] and drag around the elements you want to export – they can be within an artboard, outside an artboard, or they can span several artboards!
6. Finally, rename your artboard using today’s date
Remember, if you come back to this in the future to do further work, keep duplicating, renaming and iterating so that you can always go back to earlier versions.
Bonus material
- Download our complete example web layout!
- Have a read through the Ultimate Guide to Sketch on our blog. There are some extra tips and tricks over there to supplement your learning from this course!
We hope you’ve enjoyed Sketch 101!
Proud of what you’ve achieved? Share your final layout with us on Twitter, using the hashtag #Sketch101!
Also, f you’re looking to pursue a career in UX/UI design, take your design learning to the next level, with the UX Academy experience, our flagship digital product design bootcamp.
You’ll get started with UX Academy Foundations—an intro to UI design fundamentals that includes 35+ hands-on projects and a 10-hour design challenge. You’ll work 1:1 with an expert designer in 8 mentor sessions and walk away knowing if UX design is the right field for you before making the full financial commitment to UX Academy.
UX Academy Foundations is the perfect way to keep the creativity flowing and jumpstart a career change!